| You are here: Home » Import CAD Formats » NGRAIN's 3KO Solutions |

This dialog box controls how referenced bitmap texture files will be handled during the CINEMA-4D export process. These two options are basically:
1. Output a filename reference to a file on the local disk. Do not modify the bitmap filename reference and do not perform any bitmap conversion. This is useful if your bitmaps are already in a format recognized by the destination 3D program.
2. Same as #1 except that bitmap file format conversion is done under user control. A file reference will be added to the CINEMA-4D file, and a new bitmap image of the desired file format, and with the desired bit depth and resolution will be created.
Texture Bitmap Handling Method (Combo Box)
This combo box determines the preferred method to output texture bitmap disk references:
1] No Bitmap Conversion, No Bitmap Filename Changes

If this combo box option is selected then:
- The texture image will be placed in the CINEMA-4D file as a texture reference.
- The filename and file path to the texture image on disk will not be changed.
- The filename extension on the bitmap reference will not be changed.
- The path to the bitmap will not be changed.
- No automatic bitmap conversion will be performed.
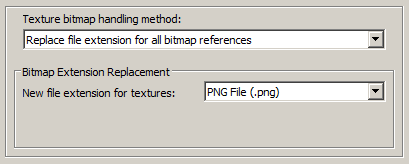
2] Replace File Extension For All Bitmap References

This is similar to option # 1 above, except that:
- The file reference placed in the CINEMA-4D file will be changed such that its file extension is changed to that specified on the dialog box.
For example, if the option is set to 'TIFF' then all bitmap filename references will be changed so that their file extensions end in '.tif'.
This is a useful option when all of the referenced texture maps have already been converted to this desired file format on disk.
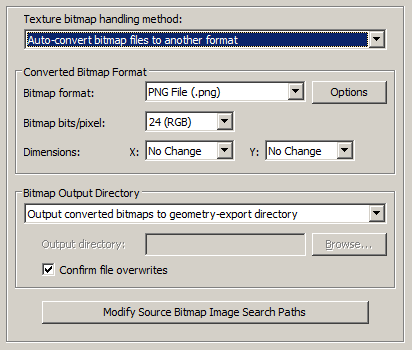
3] Auto-Convert Bitmap Files to Another Format

If this combo box option is chosen then all 2D bitmap images that are used by the current scene will be automatically tagged and converted into a new user-specified 2D bitmap file format on the local disk. The bitmap image will be written to the CINEMA-4D file as a file reference and not as an embedded texture image.
For example, if the scene makes references to PNG bitmap files then this option can be selected so that the PNG images are automatically converted to the TIFF format.
If the bitmap texture(s) cannot be found in the location specified by the pathname pre-pended to the texture filename then the CINEMA-4D exporter will search for the texture(s) in all directories specified in the file search paths (these can be modified by pressing the "Modify Source Bitmap Image Search Paths" button).
Converted Bitmap Format
Bitmap File Format (Combo Box)
This combo box lists the desired destination bitmap file format that all texture bitmap images should be converted into.
Bitmap Bits/Pixel: 2, 4, 8, 24 (Combo Box)
This combo lists determine the number of bits/pixel to write out to the new 2d bitmap file. The default is 24 bits. A color quantization algorithm will be used for the 2, 4 and 8 bits/pixel output formats. Not all bitmap file formats can accept 2-8 bits/pixel (e.g. in particular JPEG).
Dimensions: X = #, Y = #
These two drop-down list boxes determine the X and Y resolution for the converted bitmap file(s):
No Change = Do not change the X or Y size Closest = Use the next highest power-of-2 size 2, 4, 8, ... 256, 512 = Choose a specific size for the X or Y dimension Bitmap Output Directory
This combo box determines where the new bitmap file will be written to. Note that enabling the "Replace file paths in all bitmap file references" option or the "Strip file paths from all bitmap references" option from the 'Bitmap Image File Paths Panel' will change the path prefix for the converted bitmap even though it was saved to disk in the location specified by one of these options.
Output Converted Bitmaps To Geometry-Export Directory
The new bitmaps will be written to the directory where the exported files are being written to.
Output Converted Bitmaps To The Specified Directory
The new bitmaps will be written to the directory specified by the input text edit box (labeled as 'Output Directory'). This directory can be changed by pressing the 'Browse' button.
Confirm File Overwrites
If this checkbox is enabled (checkmarked) then the bitmap converter will confirm any potential overwrites of existing bitmap files on disk that have the same filename and extension as the one being written. If this option is disabled then no confirmation will be made.
Modify Source Bitmap Image Search Paths
In specific circumstances it may be necessary to inform the CINEMA-4D exporter where your source bitmap images are located so that automatic bitmap file conversion process or the image embedding process can locate and load the images.
If the CINEMA-4D exporter reports warnings that specific images could not be located during automatic bitmap conversion or embedding, then press this button so that the Search-Paths dialog box appears. Using this dialog box you can inform the CINEMA-4D exporter where the source bitmaps are located.


